+91 99980 88430 | +91 95589 17778
 info@convello.in | sales@convello.in


At 2:18 p.m., the packaging line is technically running. The motor is healthy, the belt is centred and the downstream roller conveyor has no fault. Yet every few minutes, one carton reaches the small gap between the two sections, turns a few degrees and catches its front corner.
An operator standing nearby gives it a quick nudge. The carton moves on. Nobody records a stoppage because the conveyor never fully stopped. By the end of the shift, however, that operator has corrected the same transfer dozens of times, two labels are scuffed, one carton has been re-packed and the packing team has learned to keep somebody close to the handoff.
This is an illustrative shop-floor composite, but the behaviour is familiar in many factories and warehouses: the individual conveyor sections work, while the transfer between them relies on human judgement.
| THE PRACTICAL TEST If an experienced operator can “make the transfer behave” but a new operator cannot, the line may be relying on hidden technique rather than repeatable engineering. |
A good conveyor transfer point does more than close a physical gap. It carries the product through a brief change in support, friction, speed, direction and control without allowing the product to tip, skew, sag, collide or become trapped. This guide explains how to design that handoff around the real product and the real operating conditions – not only an empty conveyor during installation.
What Is a Conveyor Transfer Point?
A conveyor transfer point is the location where a product or material leaves one conveying surface and enters another conveyor, machine, workstation, chute, lift, turntable or process. It may be a straight transfer between two conveyors, a 90-degree pop-up transfer, a belt-to-roller handoff, a decline into a machine, or a small-product transfer across a nosebar.
For unit loads such as cartons, totes, trays, pouches and components, the critical question is whether the product remains supported and controlled while its centre of gravity crosses the transition. For bulk materials, the design also has to manage trajectory, loading, impact, dust and spillage. The engineering details differ, but the principle is the same: the receiving equipment must accept the product in a predictable condition.
Convello currently offers belt, roller and cross-transfer systems that can be integrated with machines, scanners, weighing systems, automated controls and perpendicular conveyor paths. Its product guidance also highlights the need to check transfer gaps, line speeds, product support and safe access around transfer locations.
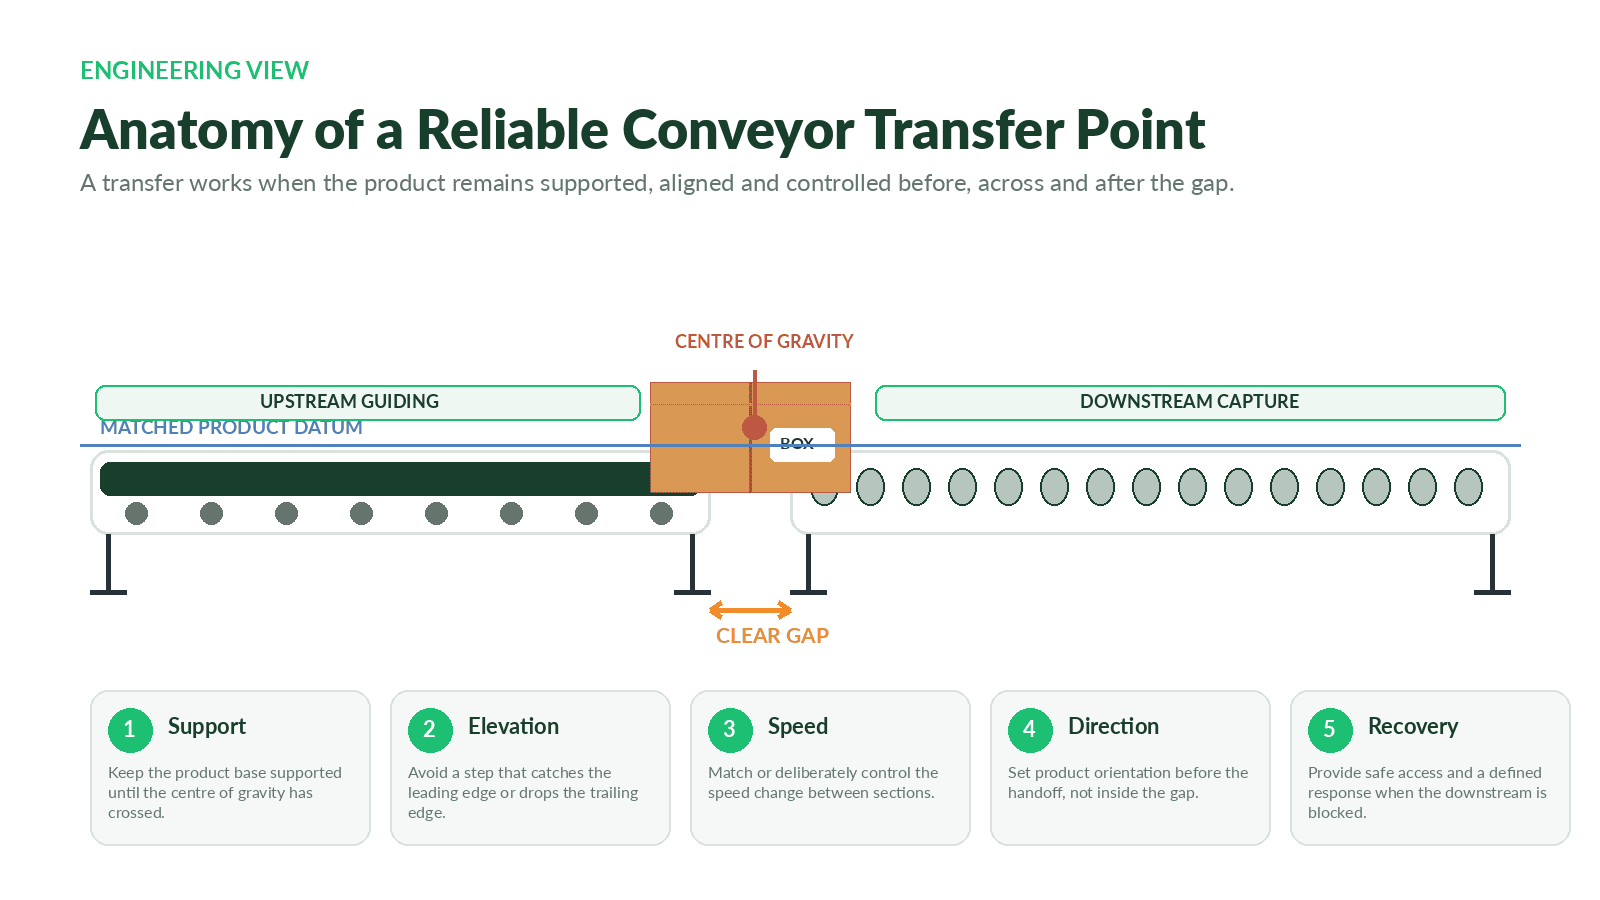
Figure 1. A reliable transfer keeps the product supported, level, aligned and controlled before, across and after the gap.
Why Small Transfer Problems Create Large Operational Losses
Transfer faults are easy to underestimate because many of them are short. A carton hangs for three seconds, an operator straightens a tote, or a pouch is placed back on the belt. Individually, each event looks minor. Repeated across a shift, those micro-interventions create lost attention, unstable throughput, product damage, blocked sensors and unsafe reaching.
The visible alarm can also appear after the real cause. A photo-eye may report a fault, but the product may have rotated at an upstream transfer. A labeller may receive cartons at inconsistent angles because the preceding belt and roller sections have different speeds. A checkweigher may reject a pouch because it arrived folded after crossing a gap that did not support its base.
For that reason, troubleshooting should follow the product upstream. Ask what condition the product was in before it reached the faulted machine, and compare the first good product with the first bad one.
Common Warning Signs at Conveyor Transfer Points
| Warning sign | What the team sees | Cause groups to investigate |
| Leading edge catches | The product stops at the gap or strikes the receiving frame. | Gap, height step, sharp plate edge, low product stiffness. |
| Product arrives skewed | One corner leads and guides must correct the item. | Uneven friction, poor upstream orientation, speed mismatch, guide pressure. |
| Trailing edge drops | The product pivots or impacts after the centre passes the gap. | Too little support, large gap, high centre of gravity, poor receiving height. |
| Pouch sags or folds | Flexible packaging dips into the transfer. | Unsupported base, roller pitch too large, unsuitable dead plate. |
| Scuffing or label damage | Marks appear at the same product location. | Excessive sliding, rough plate, back pressure, guide contact. |
| Repeated sensor fault | The same photo-eye or scanner alarms intermittently. | Product angle varies upstream; sensor placed inside unstable transfer zone. |
| Operators routinely nudge products | The line runs only with constant attention. | Transfer geometry or control logic is not repeatable. |
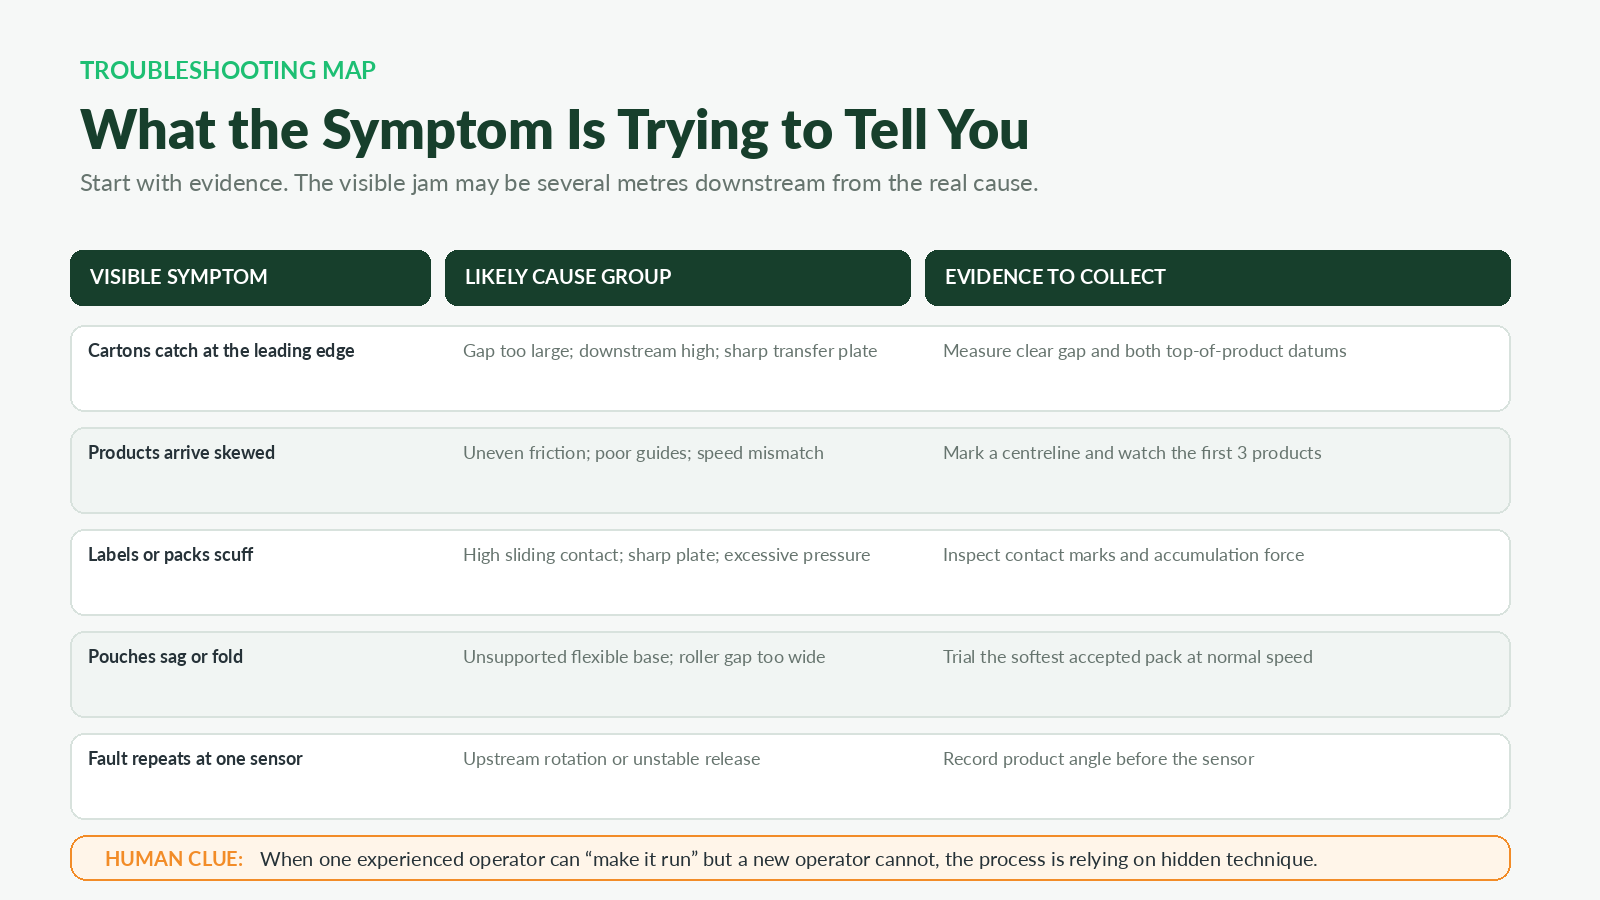
Figure 2. Begin with the visible symptom, then collect evidence before changing settings.
Transfer Point Types and Where They Fit
| Transfer method | Typical use | Important design check |
| Short transfer plate or dead plate | Rigid cartons, trays and totes over a small gap. | Simple and compact; check sliding friction, sharp edges and product marking. |
| Nosebar or small-diameter pulley transfer | Pouches, small packs and components requiring very short unsupported distance. | Reduces the gap but may limit belt construction, load and pulley selection. |
| Roller bridge or close-pitch rollers | Flat, rigid products moving between roller or belt sections. | Works when the product base remains supported and rollers suit the load. |
| Pop-up belt or roller transfer | 90-degree movement of cartons, totes and selected unit loads. | Requires controlled stopping, lift sequence, product position and downstream availability. |
| Chain transfer | Pallets, fixtures and heavy loads. | Strong support for runners; verify load orientation, lift stroke and guarding. |
| Powered side transfer or pusher | Routing, reject and lane-change applications. | Product stability and lateral acceleration must be controlled. |
| Chute or gravity transition | Selected products or bulk material moving downward. | Check impact, speed, product orientation, noise, wear and containment. |
15 Practical Conveyor Transfer Point Design Decisions
A transfer point should be treated as a small machine inside the larger conveyor system. The following decisions determine whether that small machine behaves consistently on a busy shift.
1. Design Around the Worst Accepted Product, Not the Best Sample
A clean, square, fully filled carton is easy to transfer. The real challenge may be the smallest carton, the softest pouch, the bowed tote, the tray with a flexible base or the package with a loose label edge. Record minimum and maximum length, width, height, weight and base stiffness. Include packaging conditions that quality control still accepts, even if they are not visually perfect.
2. Use the Product Base in the Direction of Travel
The dimension that matters most at a straight transfer is the product length that bridges the gap in the direction of movement. A wide carton can still be vulnerable when its travel length is short. For irregular parts, identify the actual contact points rather than relying only on the outer dimensions.
3. Track the Centre of Gravity Across the Gap
A product begins to tip when the supported portion can no longer control its centre of gravity. Tall, top-heavy or unevenly loaded products require more stable support than low cartons of the same footprint. Observe whether the product is accelerating, stopping or touching a guide at the same time it crosses the transfer, because those forces can change the tipping behaviour.
4. Match the Product Datum, Not Only the Conveyor Frame
Two conveyor frames can be level while the actual conveying surfaces are not. Belt thickness, slider beds, roller height, wear strips and transfer plates all affect the top-of-product datum. Even a small upward step can catch a soft carton corner; a downward step can make the trailing edge drop and rotate the product.
5. Minimise the Unsupported Distance
Reduce the clear distance between the last reliable support on the upstream section and the first reliable support on the downstream section. That may mean repositioning end rollers, using a smaller nose radius, installing a bridge roller, changing the plate geometry or selecting a different conveyor type. A thin plate is not automatically a good transfer if it flexes, has a sharp edge or creates too much sliding resistance.
6. Choose a Transfer Surface That Fits the Product
Rigid cartons may cross a smooth plate successfully, while soft pouches may need continuous belt support. Heavy pallets may require chain strands or close roller support. Hot, oily or abrasive parts may need a metal surface and controlled contact. The transfer method should reflect the product base, load, contamination and temperature – not merely the available gap.
7. Control the Speed Change Deliberately
An upstream and downstream conveyor do not always need identical speeds, but the difference should be intentional. A faster receiving conveyor can create separation; it can also stretch, rotate or destabilise flexible packs. A slower receiving conveyor can create compression and back pressure. Test the product at start-up, normal running, controlled stop and restart.
8. Set Product Orientation Before the Transfer
Guides are most effective when they establish direction before the product loses support. Trying to rotate or aggressively centre a product inside the gap often creates corner contact. Use upstream guide length, tapered entry, controlled spacing or an orientation device so the item approaches the transfer in a repeatable condition.
9. Design the Downstream Capture Zone
The first section after the gap must receive the product without allowing it to drift. The downstream conveyor may need a short capture guide, a suitable friction surface or a stable roller pattern. Avoid placing a rigid guide so close that it pinches an acceptable variation in product width.
10. Check Transfer Angle and Skew
Straight transfers are usually more forgiving than diagonal or side transfers. Where products enter at an angle, analyse the leading corner, lateral velocity and the moment created around the centre of gravity. A 90-degree transfer needs the product to stop in a known position before the lift or cross movement begins.
11. Match Roller Pitch to the Product Base
On roller conveyors, the product must remain supported by enough rollers as it enters, crosses and leaves the transfer. A commonly used planning principle is to maintain support from at least three rollers, subject to product rigidity, load and the manufacturer’s engineering criteria. Small boxes, flexible trays and damaged cartons may need closer pitch or a different transfer surface.
12. Position Sensors Outside the Most Unstable Moment
A photo-eye placed exactly where a carton is changing angle, dropping or being accelerated may generate inconsistent detection. Position presence sensors where the product state is stable. For barcode readers, check label orientation, product pitch and vibration. For 90-degree transfers, use positive position confirmation before lifting or diverting.
13. Define What Happens When Downstream Flow Stops
Many transfer jams are really blocked-destination problems. If the receiving conveyor stops, the upstream section should not continue pushing products into the gap indefinitely. Use controlled accumulation, blocked-zone logic, product spacing or upstream release control. The system also needs a defined recovery sequence after the blockage clears.
14. Provide Safe Access Without Making the Transfer Easy to Reach During Operation
Transfer points often contain nip, shear, crush or trapping hazards. Guarding should prevent access to moving hazards while allowing planned inspection, cleaning and maintenance under the correct isolation procedure. Emergency stops, interlocks and hazardous-energy controls should be based on the actual machine and site risk assessment. General ISO and OSHA references are useful starting points, but they do not replace project-specific engineering or applicable Indian requirements.
15. Make the Transfer Maintainable and Repeatable After Changeover
A transfer that works only when one guide is positioned “about two fingers from the carton” is not controlled. Use scales, stops, recipe settings, labelled positions or keyed change parts. Provide access to clean beneath plates, inspect end rollers, replace wear strips and verify fasteners. Record the exact settings that passed testing.
Four Useful Transfer Point Calculations
These calculations are screening tools for concept development. They do not replace product trials, detailed mechanical design or manufacturer validation.
1. Unsupported Gap Ratio
| SCREENING FORMULA Unsupported gap ratio (%) = clear unsupported gap / product base length in travel direction x 100 Example: a 35 mm unsupported gap under a carton with a 180 mm travel-length base gives 35 / 180 x 100 = 19.4%. The percentage alone does not prove suitability; base stiffness, centre of gravity, speed and edge condition still matter. |
Use the ratio to compare concepts, not as a universal pass/fail limit. A rigid tray may tolerate a higher ratio than a partially filled pouch. Always test the smallest and weakest accepted product.
2. Conveyor Speed Mismatch
| SCREENING FORMULA Speed change (%) = (downstream speed – upstream speed) / upstream speed x 100 Example: an upstream speed of 18 m/min and downstream speed of 24 m/min creates a 33.3% increase. That may help create spacing, but it can also rotate cartons, stretch pouches or shock fragile products unless the transition is controlled. |
3. Temporary Queue Growth
| SCREENING FORMULA Queue growth = (upstream release rate – downstream acceptance rate) x blockage time Example: upstream releases 30 items/min, downstream accepts 26 items/min and the condition lasts 1.5 minutes. Queue growth = (30 – 26) x 1.5 = 6 items. The transfer and upstream accumulation must have somewhere controlled to hold those six items. |
4. Product Support on Rollers
| PLANNING CHECK Approximate maximum roller pitch = product base length in travel direction / desired number of support rollers Example: for a 300 mm rigid carton and a planning target of three supporting rollers, an initial pitch check is 300 / 3 = 100 mm. End gaps, roller diameter, damaged cartons, load distribution and actual transfer geometry can require closer support. |
Selecting the Transfer Method by Product Format
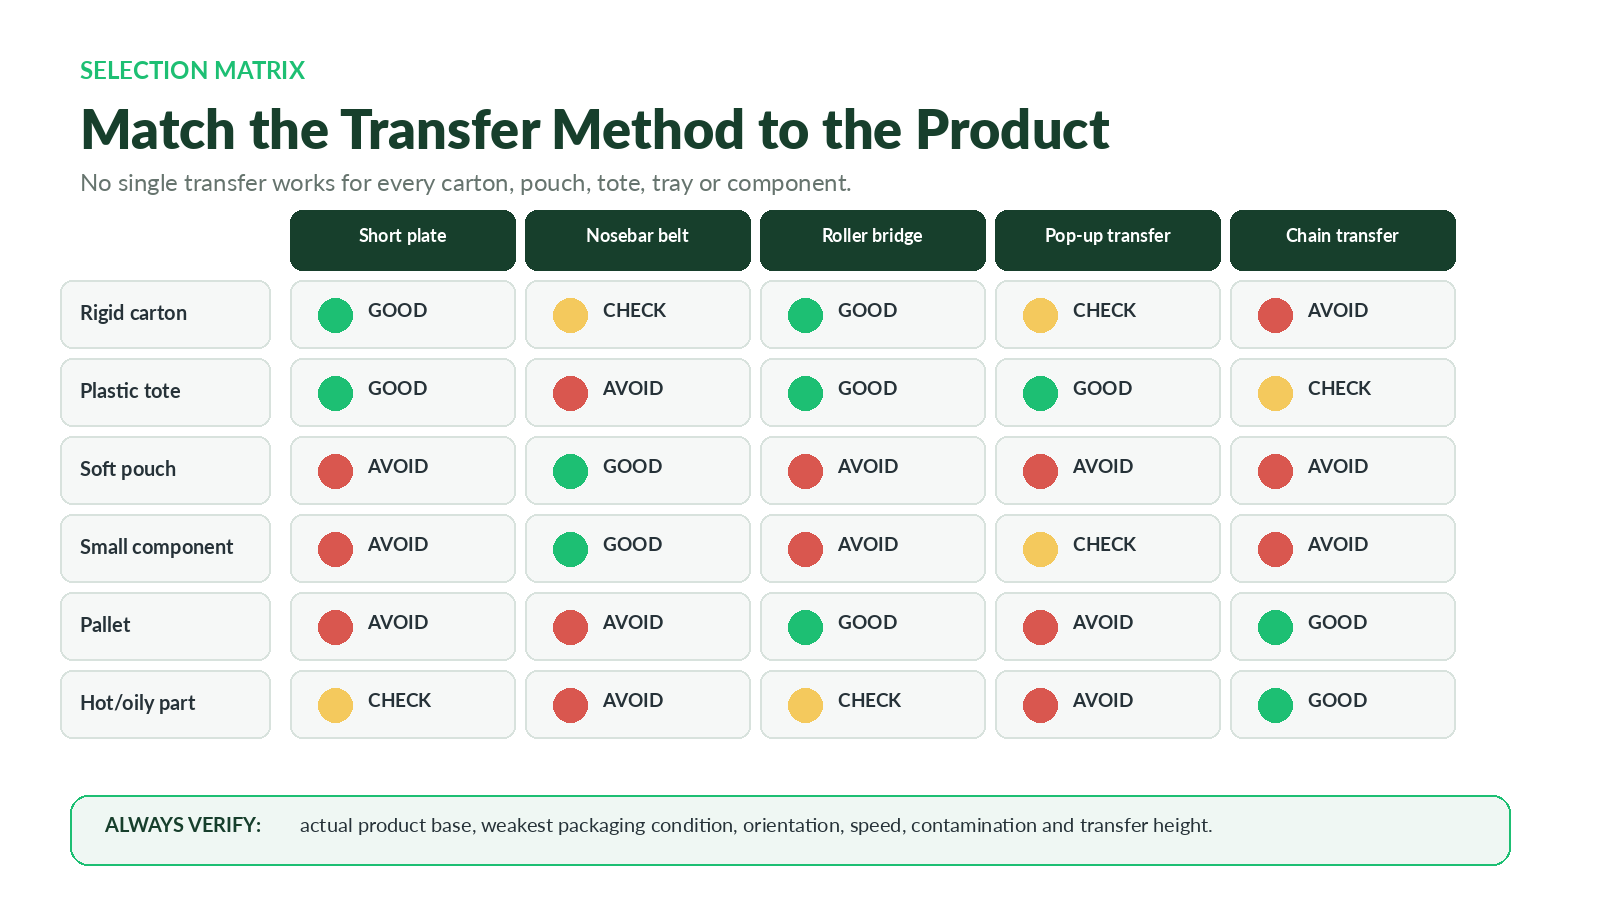
Figure 3. Transfer selection should begin with the product base and process, not a preferred component.
| Product format | Likely transfer options | Human-centred test condition |
| Rigid carton or tray | Short plate, roller bridge, close-coupled belt or roller transfer. | Test damaged corners, low fill, labels and the smallest footprint. |
| Plastic tote or crate | Roller bridge, powered roller, pop-up transfer or belt section. | Check moulded feet, ribs, base wear and nesting features. |
| Soft pouch or bag | Continuous belt, nosebar transfer or vacuum support where justified. | Use the softest, least-filled acceptable pack; avoid unsupported roller gaps. |
| Small component | Nosebar belt, timing belt, pocket, fixture or dedicated transfer device. | Control orientation and ensure the part cannot enter the gap. |
| Pallet or fixture | Powered roller, chain transfer, lift-and-transfer or turntable. | Verify runner direction, fork openings, damaged boards and load stability. |
| Hot, oily or sharp part | Metal belt, chain, slat, fixture or engineered wear surface. | Check temperature at contact, drainage, burrs, oil and product marking. |
Three Practical Transfer Scenarios
Scenario 1: Cartons Moving from a Belt to a Roller Conveyor
A packing belt delivers cartons to a powered roller line. Most cartons cross cleanly, but the smallest size turns slightly and catches its front corner. Operators initially ask for a stronger guide. Measurement shows that the roller conveyor is 4 mm higher than the loaded belt surface, the clear gap is largest on one side and the downstream rollers accelerate the carton before both front corners are supported.
The corrective direction is not simply “add more guide pressure.” The team levels the product datum, reduces the uneven gap, extends upstream orientation and adjusts the receiving speed. The smallest accepted carton is then tested with a softened base and a slightly crushed corner, because those are the packages that previously required a nudge.
Scenario 2: Flexible Pouches Between Inspection Machines
A filled pouch leaves a checkweigher and enters a metal detector conveyor. Empty trials look perfect, but warm product softens the pouch and seasoning dust reduces surface friction. Some packs sag at the transfer, fold at the leading edge and enter the detector off-centre.
The team treats the pouch as a flexible surface rather than a rigid parcel. It shortens the unsupported distance, uses a suitable small-radius belt transfer, aligns the conveyor surfaces and tests clean, dusty and warm pouches at normal production spacing. The final acceptance test includes a downstream stop to confirm that pouches do not compress into the transfer.
Scenario 3: A 90-Degree Tote Transfer
A tote arrives on a roller conveyor and must move sideways to a second line. The transfer works in manual mode, but during peak production, the receiving zone occasionally remains occupied. The lift rises under the next tote, creating pressure and a fault that operators clear by pulling the tote back.
The mechanical transfer is not the only issue. The control sequence needs positive product position, downstream-clear confirmation, lift status, timeouts and a defined recovery state. The safe solution removes the need for operators to pull products from a partly actuated mechanism.
Controls, Safety and Recovery Logic
A mechanically smooth transfer can still fail when the control logic does not describe the real operating states. At minimum, define what the system should do when the receiving zone is ready, blocked, faulted, in manual mode, stopped for quality inspection or recovering after an emergency stop.
| State | Required behaviour |
| Ready | Receiving conveyor is running or available; product may be released. |
| Blocked | Receiving position is occupied or downstream capacity is unavailable; upstream release is held. |
| Transfer in progress | Product has left the upstream zone but has not yet been confirmed downstream. |
| Timeout | Expected product confirmation did not occur within the allowed time; system stops in a defined state. |
| Manual recovery | Authorised personnel use a controlled procedure with appropriate isolation or safe manual mode. |
| Restart | All guards, zones and product positions are verified before a deliberate restart. |
Do not use an emergency stop as the normal method for clearing small flow interruptions. Equally, do not assume that a standard stop removes every hazard. Gravity, pneumatic pressure, raised mechanisms, queued product and stored mechanical energy may remain. The machine-specific isolation procedure must address those conditions.
How to Commission a Conveyor Transfer Point
Commissioning should prove more than “the first carton crossed.” A reliable test plan uses the full accepted product range and deliberately creates conditions that will occur during production.
| Test area | What to prove |
| Geometry | Measure the final gap, conveying-surface heights, guide positions and approach angle. |
| Product range | Run smallest, largest, lightest, heaviest, softest and least-perfect accepted packaging. |
| Operating states | Test start, stop, restart, full speed, reduced speed, downstream blocked and recovery. |
| Flow | Run sustained peak flow long enough to reveal queue growth, guide pressure and heating. |
| Detection | Verify presence sensors, barcode readers, no-read handling and product confirmation. |
| Damage | Inspect labels, corners, seals, surfaces and product orientation after repeated cycles. |
| Safety | Verify guarding, access, emergency stops, interlocks and the approved isolation procedure. |
| Documentation | Record settings, accepted samples, photos, spare parts, inspection points and owners. |
| A BETTER ACCEPTANCE QUESTION Do not ask only, “Did it transfer?” Ask, “Did it transfer the worst accepted product repeatedly, at peak flow, through a stop and restart, without routine human correction?” |
Eight-Step Conveyor Transfer Point Design Workflow
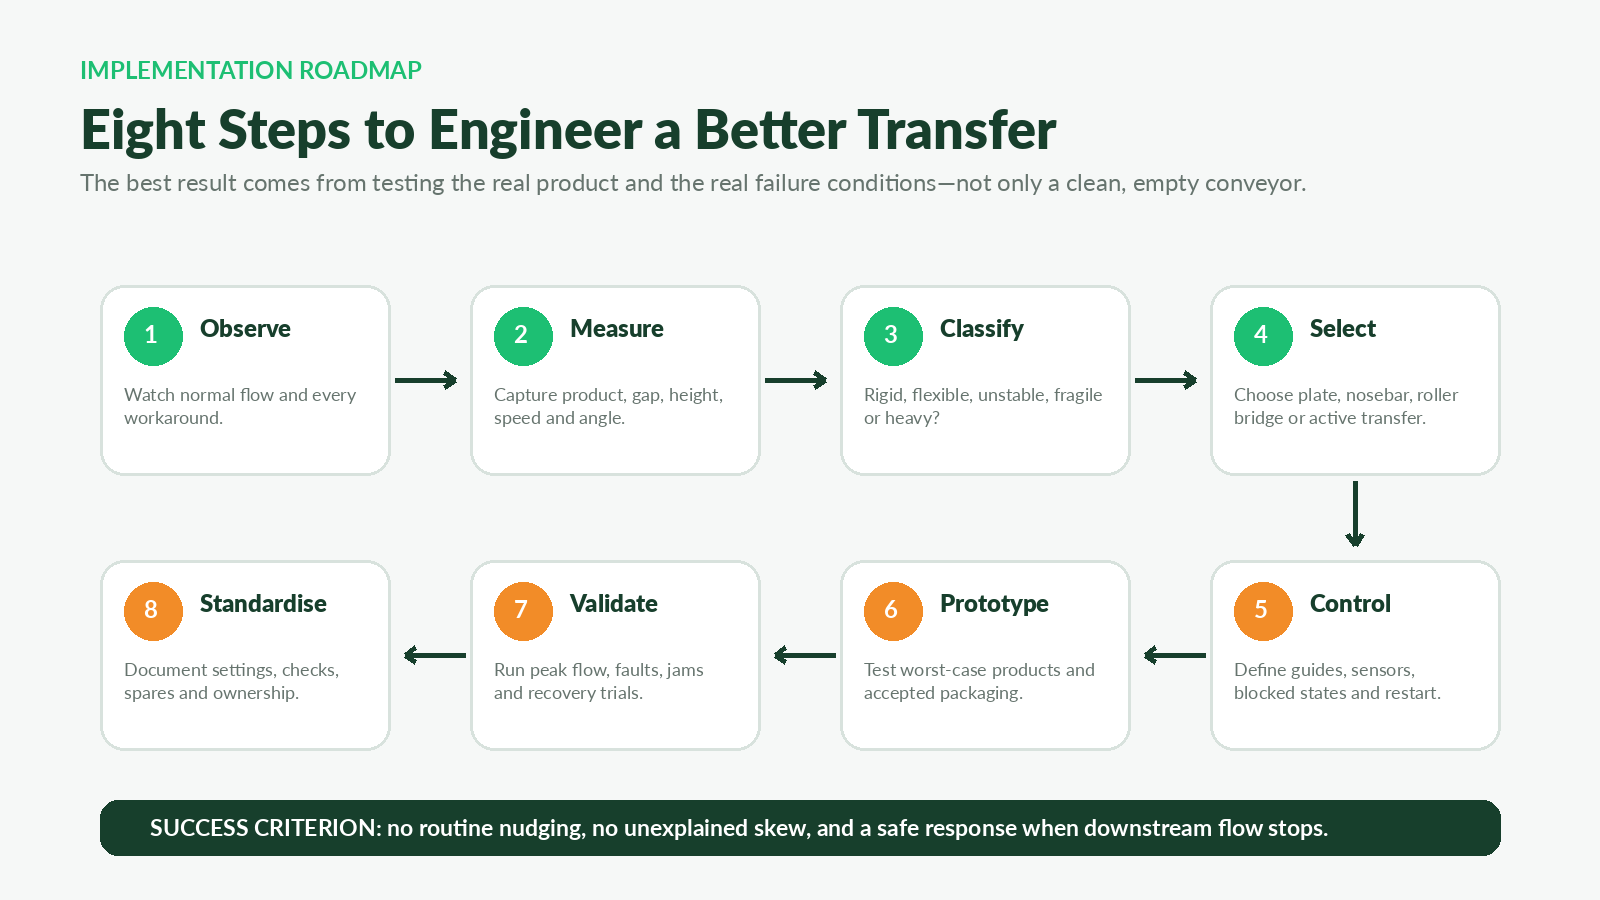
Figure 4. Observe, measure, classify, select, control, prototype, validate and standardise.
- Observe the real operation: Watch where products hesitate, rotate, sag, collide or receive a manual correction. Record the conditions, not only the alarm.
- Measure the product and transfer: Capture product dimensions, base condition, centre of gravity, gap, surface heights, speed, angle, guide positions and sensor locations.
- Classify the product behaviour: Decide whether the item is rigid, flexible, unstable, fragile, hot, oily, abrasive, irregular or orientation-sensitive.
- Select the transfer principle: Compare plate, nosebar, roller bridge, active transfer, pusher, chain, curve or dedicated fixture.
- Define control and recovery: Document ready, blocked, transfer, timeout, fault, manual-recovery and restart states.
- Prototype with real products: Use worst-case accepted packaging and actual contamination, temperature and speed.
- Validate normal and failure conditions: Run sustained peak flow, downstream stops, sensor faults, jams and controlled recovery.
- Standardise the final settings: Record positions, recipes, photographs, inspection points, spares, ownership and acceptance criteria.
Information to Share for an Accurate Transfer Point Quotation
| Requirement | Details to provide |
| Product samples | Smallest and largest product; worst accepted packaging; product drawings and photographs. |
| Product data | Length, width, height, weight, base stiffness, centre of gravity, temperature and surface condition. |
| Flow data | Average, sustained peak and short-burst rate; product pitch; accumulation requirements. |
| Existing equipment | Conveyor types, belt or roller details, machine interfaces, speeds, elevations and controls. |
| Transfer purpose | Straight handoff, 90-degree transfer, sortation, reject, merge, elevation change or machine feed. |
| Environment | Dust, moisture, washdown, oil, heat, hygiene, corrosion and cleaning method. |
| Controls | PLC platform, sensor types, upstream and downstream handshakes, blocked-state logic and data needs. |
| Site constraints | Available length and width, access, floor loading, guarding, walkways and maintenance envelope. |
| Acceptance criteria | Allowed jam rate, damage limit, orientation tolerance, peak throughput and test duration. |
Common Transfer Point Mistakes
- Testing only perfect products. The first sample from a new carton batch is rarely the most difficult product the line will see.
- Correcting every jam with more belt tension or guide pressure. That can hide height, alignment, friction or downstream-control problems.
- Measuring frame height instead of conveying-surface height. The product responds to the belt, roller or plate datum, not the frame.
- Placing the sensor where the product is still changing angle. Detection becomes inconsistent and the alarm appears to be an electrical fault.
- Ignoring the blocked-destination condition. A smooth transfer under free flow may fail as soon as products begin to accumulate.
- Allowing operator nudging to become normal work. A repeated manual correction is evidence, not a sustainable operating method.
- Changing several variables at once. The team loses the evidence needed to identify the real cause.
- Treating the transfer plate as a minor fabrication detail. Edge shape, stiffness, finish, cleanability and mounting accuracy can determine performance.
- Forgetting maintenance removal space. End rollers, sensors, belts and plates still need to be inspected and replaced.
- Freezing the design before testing actual packaging. Product behaviour cannot always be predicted from a drawing.
Frequently Asked Questions About Conveyor Transfer Point Design
1. What is a conveyor transfer point?
It is the location where a product or material leaves one conveyor, machine or surface and enters another. The design must control product support, height, gap, direction, speed and the receiving equipment state.
2. How small should the gap between conveyors be?
There is no universal gap. It should be as small as practical while allowing safe operation, belt or roller movement, cleaning and maintenance. Suitability depends on the product base, rigidity, centre of gravity, speed and transfer method.
3. What is a conveyor dead plate?
A dead plate is a stationary bridge that supports a product across a short gap. It can be effective for rigid products, but its surface finish, thickness, edge geometry and sliding friction must be checked.
4. When is a nosebar transfer useful?
A nosebar or small-diameter pulley is useful when small or flexible products need a very short unsupported distance. The belt construction, pulley diameter, load and maintenance requirements must be compatible.
5. Why do cartons skew between a belt and roller conveyor?
Common causes include uneven gaps, different surface heights, a speed mismatch, unequal friction, poor upstream orientation or one carton corner contacting the receiving rollers first.
6. Should two conveyors run at the same speed?
Often similar speeds create a gentle handoff, but a deliberate speed difference may be used for spacing or process control. The change should be tested with the real product because it can also create rotation, compression or shock.
7. How should soft pouches be transferred?
Soft pouches usually need continuous support, short gaps and controlled friction. Test the least-filled, warmest, dustiest or oiliest acceptable pouch, because it may behave differently from a firm sample.
8. How does a 90-degree conveyor transfer work?
The product is stopped or positioned on the main conveyor, then a lifting belt, roller or chain mechanism raises or engages it and moves it sideways. The sequence needs product position, downstream-clear and mechanism-status confirmation.
9. Where should transfer sensors be positioned?
Place sensors where the product condition is stable and detection is repeatable. Avoid locations where the product is dropping, rotating, vibrating or partially unsupported unless the sensor and logic are designed for that condition.
10. Can an existing transfer point be retrofitted?
Yes. Common improvements include a smaller end roller, bridge roller, revised transfer plate, matched elevations, better guides, speed control, sensors, blocked-zone logic or a dedicated transfer module. The surrounding structure and guarding must also be reviewed.
11. How can product damage at a transfer be reduced?
Reduce impact and unsupported distance, match surfaces and speeds, remove sharp contact points, control accumulation pressure and test labels, seals, corners and fragile surfaces after repeated cycles.
12. What should be included in transfer-point acceptance testing?
Use the full product range at sustained peak flow and test normal running, stops, restart, downstream blockage, no-read products, manual recovery, product damage, sensor performance and safe access.
Conclusion: Engineer the Handoff, Not Just the Conveyor Sections
A conveyor line can have reliable motors, correctly tracked belts and healthy rollers and still perform poorly at the points where products change support. Those brief handoffs are where dimensions, packaging quality, speed, friction, orientation, control logic and operator behaviour meet.
The most useful transfer-point review is often simple: stand beside the line during a busy period and watch the first product that needs help. Measure what changed before the jam, then test the weakest accepted product under the same condition. The goal is not a transfer that works once while an engineer is present. The goal is a transfer that works repeatedly without a skilled operator quietly correcting it.