+91 99980 88430 | +91 95589 17778
 info@convello.in | sales@convello.in


| Quick answer A useful conveyor maintenance checklist does three things: it makes changing condition visible, gives each defect an owner, and defines what must happen before the conveyor returns to service. The exact intervals and limits should come from the equipment manufacturer, actual duty, environment, safety assessment and maintenance history – not from a copied checklist alone. |
At 7:12 a.m., the conveyor was still running
The line had not stopped, so nobody called it a breakdown. A return roller near the transfer end made a thin metallic chirp each time a carton passed. The belt had started walking a few millimetres toward the frame. One operator had mentioned the sound on the previous shift, but production was behind and the note simply said, “conveyor noisy.”
By 10:40 a.m., the bearing had tightened, the belt edge was rubbing, and cartons were arriving slightly skewed at the label applicator. The stoppage lasted less than an hour, but it pulled a fitter away from another job, interrupted packing, created a small queue of unfinished orders and turned a simple roller replacement into a rushed repair.
This is an illustrative example, but the pattern is familiar in many plants: the failure was not invisible. The warning was heard, seen or felt by someone. It simply did not travel through a clear process from observation to ownership, action and verification.
| The practical maintenance rule A good conveyor maintenance checklist is not a longer piece of paperwork. It is a short, repeatable way to notice change early, describe it clearly and close the loop before a small defect becomes a production event. |
What preventive conveyor maintenance actually means
Preventive conveyor maintenance is planned work performed before functional failure. It includes observation while the machine is operating, safe stopped inspections, cleaning, measurement, adjustment, lubrication where specified, planned replacement of wear parts, testing and accurate records. It should be supported by condition data and failure history, not treated as a calendar exercise that never changes.
The goal is not to keep every component looking new. The goal is to keep the conveyor safe, predictable and capable of moving the required product without creating avoidable damage, delays or emergency work.
- Operators notice changes in sound, product flow, tracking, cleanliness and controls during normal work.
- Maintenance technicians confirm condition safely, measure wear and correct causes rather than symptoms.
- Production leaders provide planned access instead of postponing every task until a breakdown.
- Engineering and purchasing keep drawings, specifications and critical spares aligned with the actual installed system.
- EHS or safety teams help define isolation, guarding, access and restart requirements for the site.
Safety before maintenance: isolate, verify and control stored energy
A checklist should never encourage someone to place hands, tools or clothing near moving equipment. Running observations and hands-on maintenance are different activities. When inspection requires a guard to be opened, a belt or chain to be touched, a blockage to be cleared, a component to be adjusted or a person to enter a hazard zone, the conveyor must be handled under the site’s approved energy-control procedure.
- Stop the conveyor using the normal procedure and identify every energy source, including electrical, pneumatic, hydraulic, gravity, spring tension and stored product pressure.
- Isolate and secure energy sources using the authorised lockout or isolation method for the site.
- Release or restrain stored energy, including raised, extended, tensioned or suspended conveyor sections.
- Verify the zero-energy state before work begins. A stopped HMI screen is not proof of isolation.
- Control adjacent equipment that can feed, move or restart the conveyor through an interlock or upstream command.
- Restore guards, tools, covers and access panels before controlled testing and restart.
- Use the original equipment manual, site procedure and local legal requirements for the actual job.
| Important safety note This article is a planning and editorial guide, not an equipment-specific work instruction. Isolation points, test methods, acceptable wear limits, lubrication products and restart checks must be defined for the installed conveyor by qualified personnel. |
Daily operator conveyor maintenance checklist
The daily check should be brief enough to happen even on a busy shift. Its purpose is not to turn operators into maintenance technicians. It is to capture the early changes that are easiest to see when the conveyor is doing real work.
| Observation | Question to ask | What good follow-up looks like |
| Listen | Any new chirp, scrape, knock, rattle, hum or repeated impact? | Record the exact location and when it occurs. |
| Watch product flow | Are cartons, totes, bags or components drifting, tipping, hesitating or arriving skewed? | Check the transfer and guide area; raise a defect. |
| Observe belt, chain or rollers | Is motion smooth and centred? Are rollers rotating freely? | Do not reach in; report drift, slip or stopped rollers. |
| Check transfers and guides | Are gaps, side guides and stops still supporting the product? | Remove only accessible loose debris under the approved procedure. |
| Check sensors and controls | Any false trips, slow responses, no-read events or repeated resets? | Log the device or zone, not only “sensor problem.” |
| Look for heat, smell or leakage | Any burning smell, oil leak, unusual warmth or discolouration? | Stop or escalate according to the site severity rule. |
| Check guards and emergency devices | Any loose, damaged, bypassed or missing guard? Any inaccessible stop? | Treat safety-device defects as priority items. |
| Check housekeeping | Is material building under the return path, around bearings or near the drive? | Clean safely and identify why material is escaping. |
| Close the loop | Was yesterday’s defect actually fixed and verified? | Confirm owner, due date and status. |
A note such as “conveyor noisy” is hard to act on. “Metallic chirp at return roller R-14, only when a carton crosses the labeller transfer, first heard 07:12” gives the maintenance team a starting point.
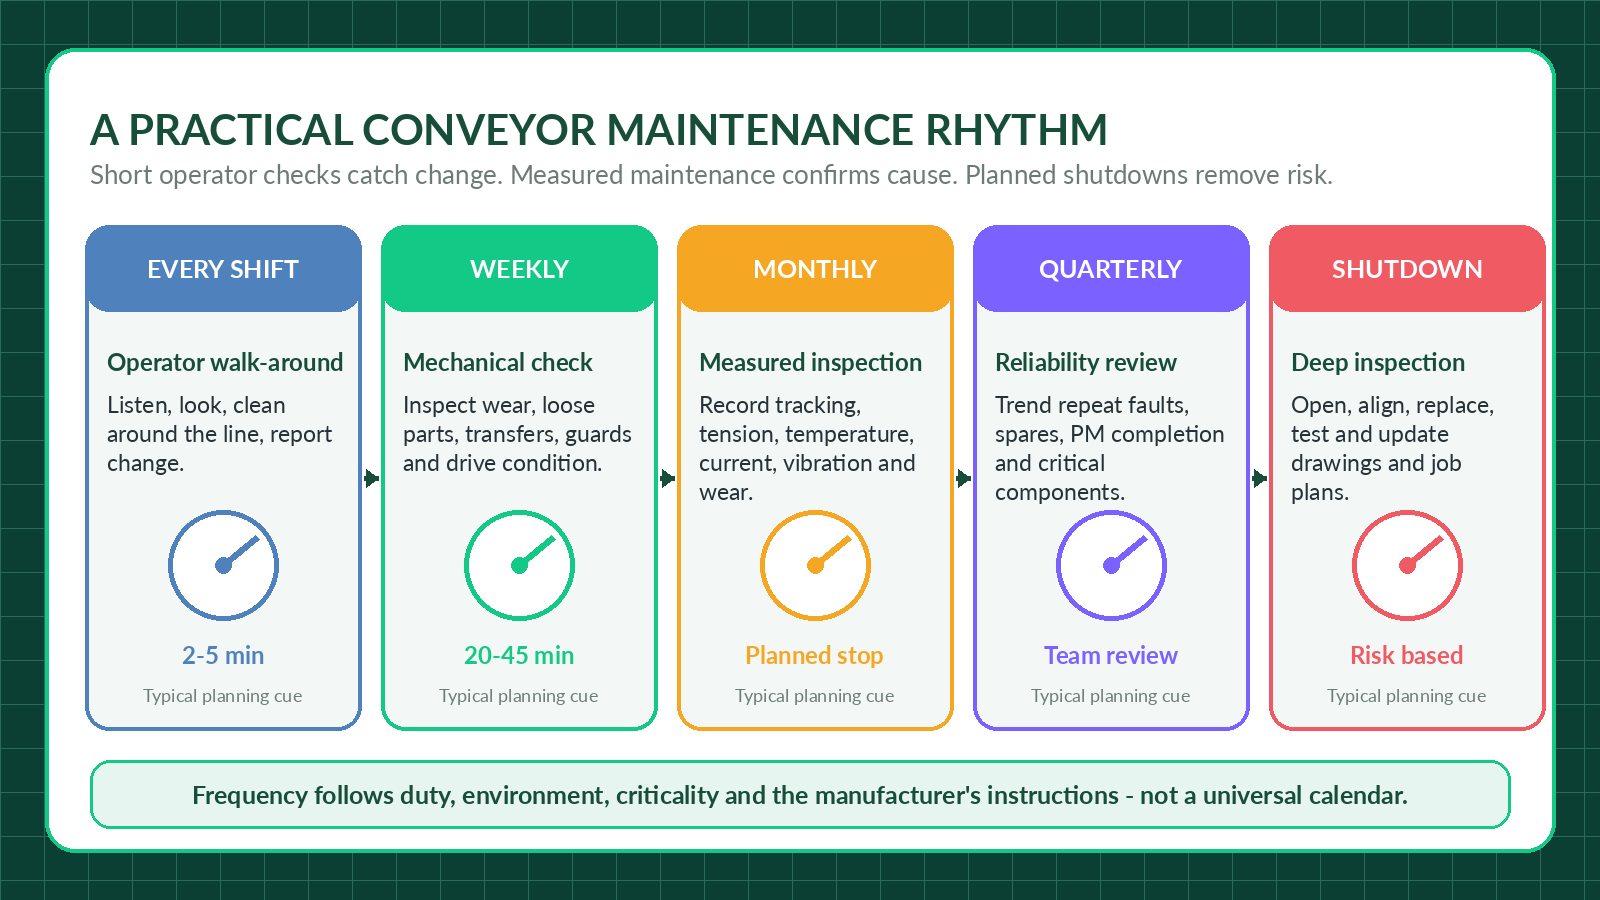
Figure 2. A useful maintenance rhythm separates operator observation, measured maintenance and planned shutdown work.
Weekly conveyor maintenance checklist
Weekly work should move beyond observation. It normally requires a planned stop and safe access. The exact tasks depend on the conveyor type, runtime and environment, but the following list provides a practical starting structure.
- Clean the conveyor and surrounding area sufficiently to inspect the machine rather than the dirt.
- Inspect belt edges, splice, surface, cleats and tracking marks for wear, rubbing or damage.
- Check rollers and idlers for free rotation, contamination, flat spots, looseness and abnormal noise.
- Inspect pulleys, sprockets, lagging, wear strips, guides and transfer components for movement or wear.
- Check guards, covers, brackets, handrails, supports, anchors and accessible fasteners.
- Inspect drive belts, chains, couplings and covers for condition and alignment.
- Look for oil leakage, damaged seals, loose cable glands, damaged conduits or sensor brackets.
- Clean sensor faces and reflectors using the approved method; confirm that mounting positions have not shifted.
- Test selected emergency stops, pull cords, interlocks and zone controls under the approved test procedure.
- Review all open defects from the previous week and escalate overdue high-risk items.
Monthly and quarterly maintenance checklist
Monthly or quarterly work should include measurable checks. A trend is often more useful than a single number: a bearing that is still below an alarm limit but is running consistently hotter than its neighbouring bearings deserves attention.
| Area | Monthly or quarterly evidence |
| Belt / chain condition | Record tracking position, tension indicator, splice condition, chain elongation or wear measurement as applicable. |
| Rollers, pulleys and sprockets | Check runout, surface wear, free rotation, lagging, tooth wear and alignment. |
| Bearings | Trend temperature, sound or vibration using a consistent location and operating condition. |
| Motor and gearbox | Review current, noise, mounting, coupling condition, leaks, oil level and ventilation. |
| Structure | Check level, squareness, supports, anchors, corrosion, impact damage and evidence of movement. |
| Electrical and controls | Qualified personnel inspect enclosures, terminals, cooling, field devices, cables, safety circuits and backups. |
| Lubrication | Use the specified lubricant, quantity and interval. Confirm that fittings and routes are accessible and labelled. |
| Wear parts and spares | Compare remaining life with the next planned shutdown and the actual lead time for replacement parts. |
| Documentation | Update drawings, asset numbers, job plans and inspection limits when the machine has been modified. |
| Reliability review | Review repeat faults, downtime, PM compliance and defects detected before failure. |
Planned shutdown or annual inspection
A major shutdown is the opportunity to inspect areas that cannot be accessed during short stops. It should be planned around condition and risk rather than automatically called “annual” for every conveyor.
- Inspect shafts, pulley and sprocket alignment, belt or chain wear, structural condition and inaccessible bearings.
- Replace components whose remaining life is shorter than the next realistic maintenance window.
- Inspect and test guarding, emergency stops, interlocks, safe access and controlled restart behaviour.
- Complete deeper electrical, motor and gearbox checks recommended by the manufacturer.
- Validate line performance with representative product after reassembly, not only with an empty conveyor.
- Back up PLC, HMI and parameter files where applicable and record any software or set-point change.
- Review whether operators and maintainers can reach inspection points without unsafe improvisation.
Twelve-point industrial conveyor inspection map
The items below apply across many industrial conveyor systems, but their design limits are not universal. One belt may require a measured tension window; another uses a gravity take-up. One chain may be lubricated; another is designed for dry operation. Always use the installed equipment specification.
| Inspection point | What to inspect | Early warning |
| 1. Belt or chain | Surface damage, edge wear, contamination, elongation, cleats, slats or modules. | Fraying, cracking, stiff links, polished rub marks or repeated product slip. |
| 2. Splice or joint | Fasteners, finger splice, hinge rod, chain connector or modular-belt joints. | Raised edge, separation, missing fastener or recurring impact at the joint. |
| 3. Rollers and idlers | Rotation, build-up, flat spots, shell damage, loose shafts and bearing noise. | One stopped roller, heat, wobble or product marking. |
| 4. Pulleys and sprockets | Lagging, grooves, tooth wear, keyways, shaft position and alignment. | Dust pattern, shiny side, worn teeth, slippage or belt edge movement. |
| 5. Bearings | Mounting, seal condition, temperature, vibration, lubrication and contamination. | Rising heat, rumble, grease purge or dark residue. |
| 6. Drive and gearbox | Motor mount, coupling, drive chain or belt, oil level, leakage and ventilation. | Current increase, knocking, oil leak, hot housing or repeated overload. |
| 7. Tension and tracking | Take-up position, tracking devices, return path, load distribution and alignment. | Frequent manual adjustment, belt walking or chain snatch. |
| 8. Frame and anchors | Level, squareness, welds, bolts, floor anchors, corrosion and impact damage. | Cracks, movement marks, looseness or misaligned transfers. |
| 9. Sensors and controls | Mounting, cleanliness, cables, reflectors, zone logic, alarms and reset behaviour. | False trips, missed product, delayed stop or repeated bypass. |
| 10. Transfers and guides | Product support, gap, guide position, stops, chutes and wear surfaces. | Skew, tip, jam, scuffing or operators frequently guiding by hand. |
| 11. Guards and safety devices | Presence, condition, access, emergency stops, pull cords, gates and interlocks. | Loose cover, blocked stop, defeated switch or unsafe restart. |
| 12. Housekeeping | Debris, spillage, dust, water, packaging film and access around the line. | Build-up near return path, slipping hazard or material entering bearings. |
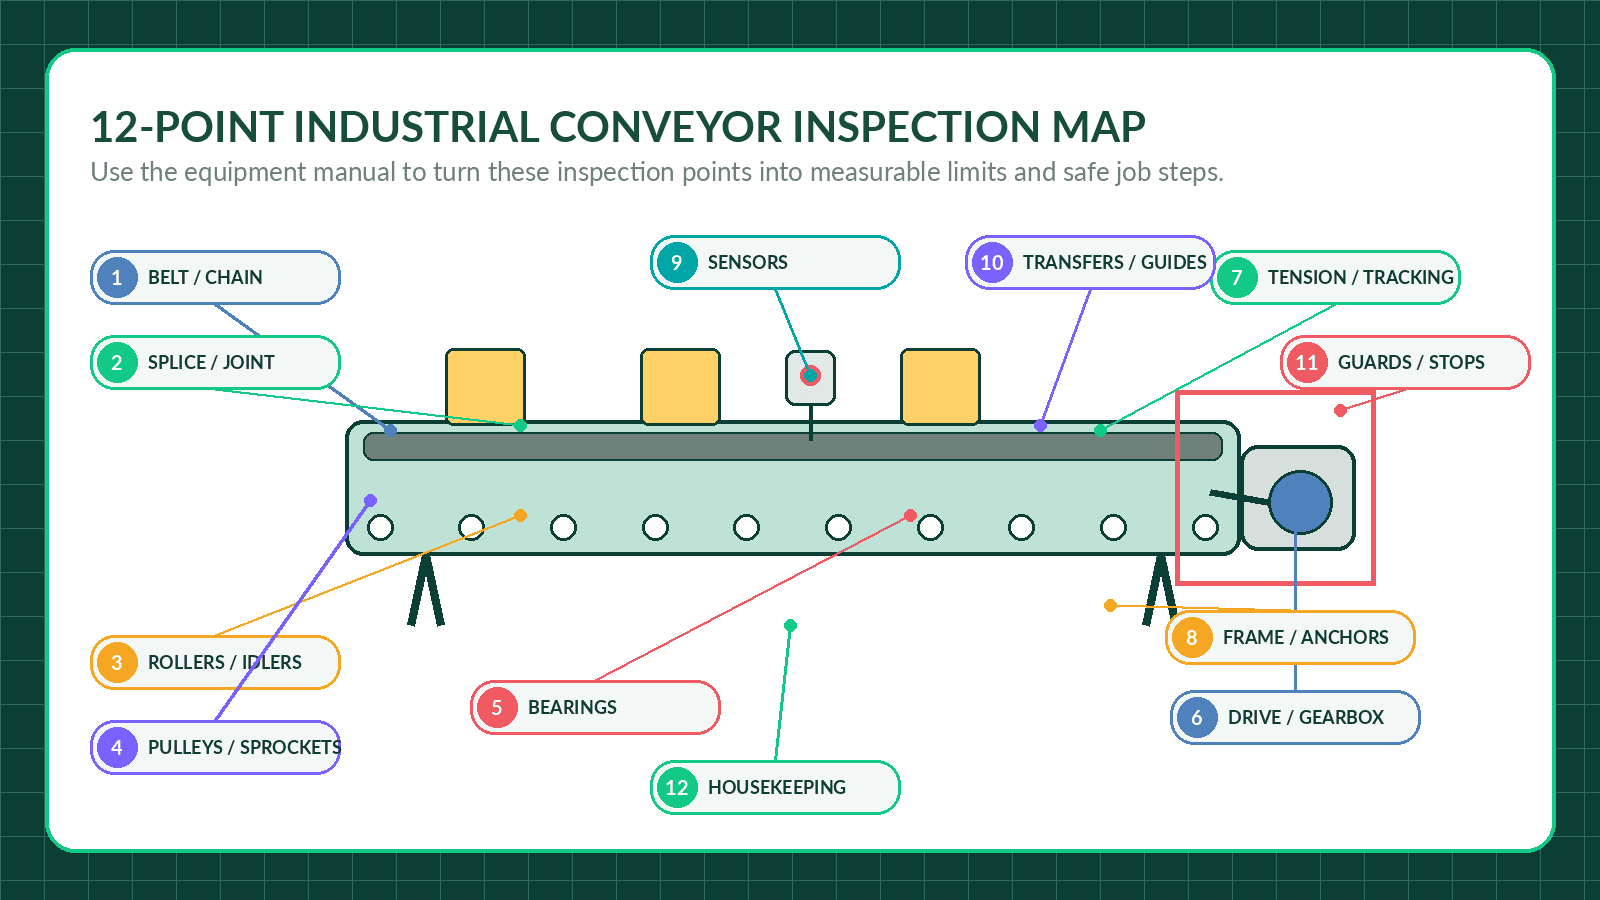
Figure 4. Twelve inspection points that should be translated into equipment-specific limits and safe work steps.
Maintenance checks by conveyor type
A single generic checklist misses the parts that make each conveyor different. Use a common core for safety, structure, drives and controls, then add equipment-specific checks.
| Conveyor type | Priority checks | Practical caution |
| Belt conveyor | Belt tracking and tension, splice, edges, pulleys, lagging, scrapers, return idlers and build-up. | Do not keep adjusting tracking without checking alignment, seized rollers, dirty pulleys and uneven loading. |
| Roller conveyor | Roller rotation, bearings, axle retention, drive belts or chains, O-rings, zones, stops and sensors. | A single stopped roller can damage packages or create a hidden drag load. |
| Slat or chain conveyor | Chain elongation, sprocket wear, wear strips, slat condition, fasteners, lubrication specification and debris. | Over-lubrication can attract contamination; under-lubrication can accelerate wear. Follow the design. |
| Screw conveyor | Flight wear, shaft and hanger bearings, seals, trough covers, drive, build-up and foreign material. | Internal access requires complete isolation and control of upstream feed and stored material. |
| Pallet conveyor | Rollers or chains, pallet stops, transfers, lift units, guides, sensors, frame load zones and impact points. | Inspect accumulated load sections, not only one moving pallet. |
| Telescopic conveyor | Extension sections, nested guides, cables, rollers or belt, boom support, limit switches, guards and vehicle interface. | Check the full travel range and retracted condition. |
| Flexible conveyor | Scissor joints, wheels, castor locks, height adjustment, roller rotation, cables and powered zones. | Damage often occurs during movement and storage, not only during conveying. |
| Incline or spiral conveyor | Grip surface, cleats, side guards, return path, chain or belt condition, guides, drive and product containment. | Inspect elevated access and dropped-product hazards as part of maintenance planning. |
Six health signals: ask what changed
Condition monitoring does not have to begin with an expensive sensor project. It begins with consistent observation and a baseline. A technician who takes temperature readings at different locations, loads and times creates noise. A technician who measures the same bearing, under a similar operating condition, creates a trend.
| Signal | Change to record | Possible areas to investigate |
| Sound | New chirp, scrape, knock, rumble or rhythm | Bearing, loose part, damaged roller, chain, splice or impact point |
| Heat | Rising bearing, motor, gearbox or belt temperature | Friction, overload, lubrication issue, misalignment or ventilation problem |
| Vibration | Increase or change in pattern | Looseness, imbalance, bearing damage, alignment or structural resonance |
| Electrical current | Higher current at similar load | Drag, jam, over-tension, failing bearing, overloaded drive or mechanical change |
| Tracking and motion | Belt walking, chain snatch or roller stall | Alignment, loading, contamination, tension or component failure |
| Product behaviour | Skew, tip, gaps, scuffing, queue or repeated reset | Transfer geometry, guides, sensor timing, speed or downstream constraint |
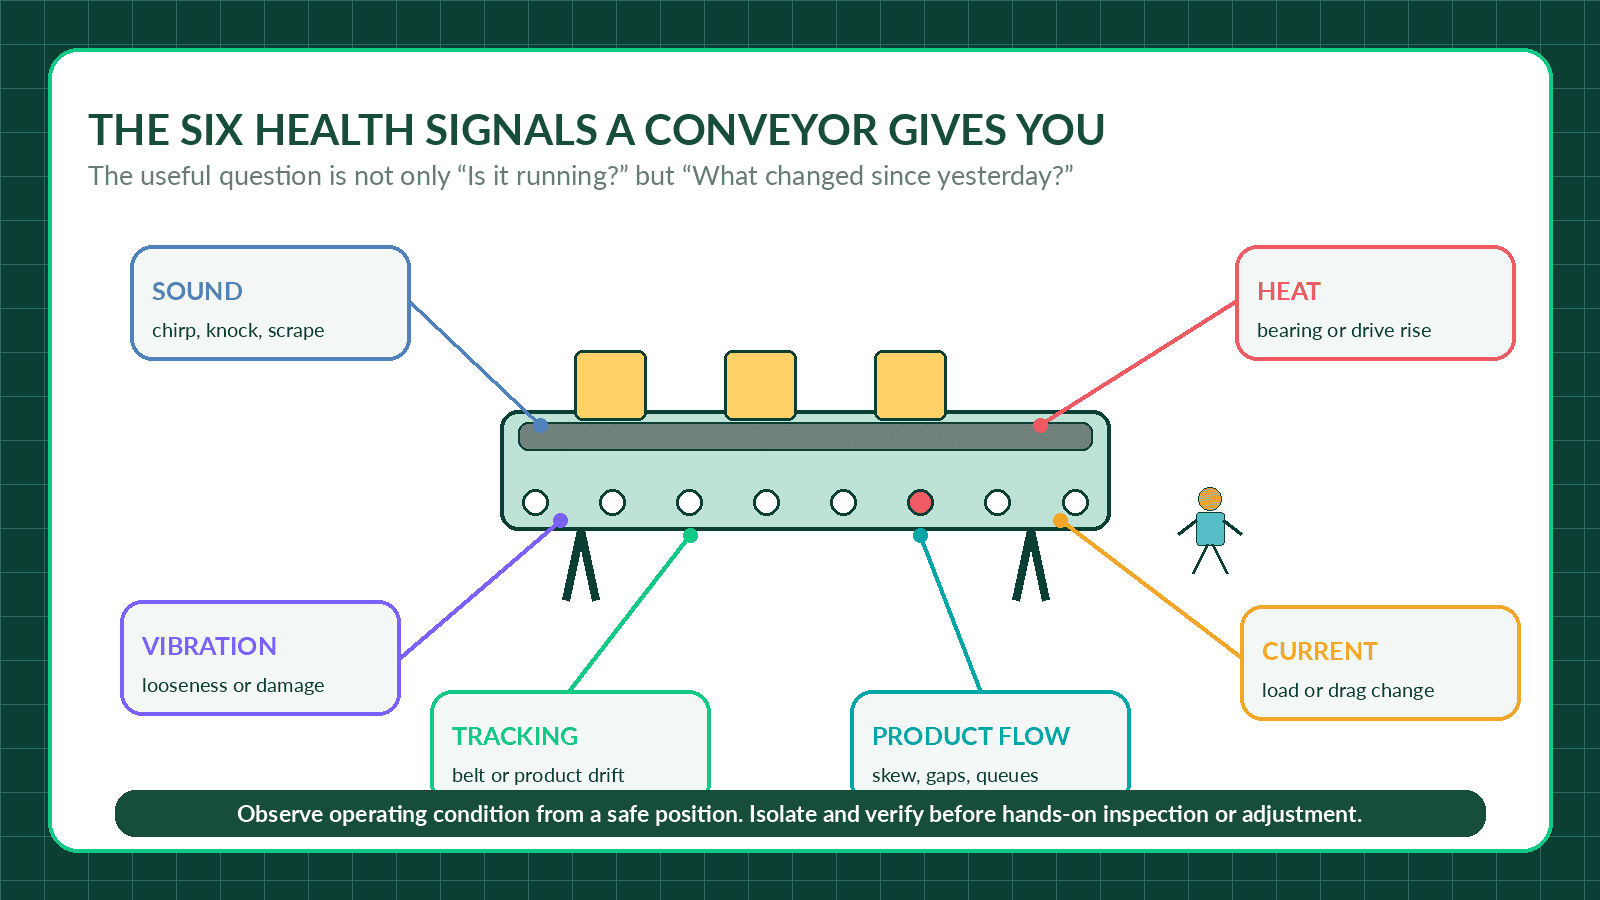
Figure 3. Conveyor condition becomes useful when sound, heat, vibration, current, tracking and product flow are recorded consistently.
Sample preventive maintenance frequency schedule
The following schedule is an example for structuring a maintenance plan. It is not a universal interval. A dusty bulk-material conveyor running continuously may need more frequent work than a clean carton conveyor running one shift. Criticality, environment, runtime, speed, load, failure history and manufacturer guidance should set the final frequency.
| Frequency | Type of work | Typical scope | Owner |
| Each shift / daily | Safe operating observation | Sound, tracking, product flow, leaks, guards, sensors, transfer points, housekeeping and open defects. | Operator |
| Weekly | Planned short stop | Clean for inspection; belt or chain, rollers, drive condition, guards, fasteners, sensors and selected safety-device tests. | Maintenance + operator |
| Monthly | Measured condition check | Tracking and tension indicators, bearing temperature, motor current, gearbox condition, wear and structure. | Maintenance / reliability |
| Quarterly or half-yearly | Reliability and deeper inspection | Alignment, critical wear, electrical checks, spares, recurring faults and PM effectiveness. | Mechanical + electrical |
| Major planned shutdown | Inaccessible areas and replacement work | Shafts, pulleys, sprockets, wear parts, safety validation, controls backup, load trial and documentation. | Cross-functional team |
| Condition-based | Triggered by trend or event | Rising heat, vibration, current, repeated jam, damage, overload, contamination or production change. | Assigned owner |
A practical packaging-line example
Consider an 18-metre packaging conveyor with a short belt section feeding a powered roller transfer. The line handles cartons in two sizes and runs two shifts. Over several days, three small observations appear: the belt drifts about 8-10 mm toward one side under the heavier carton, a return roller becomes warmer than its neighbours, and motor current is roughly 12% higher than the normal reading at a similar load.
A generic checklist might mark “belt running” and “motor running” as acceptable. A useful checklist asks for location, condition, comparison and ownership. The team records the warm roller number, the belt position under both carton sizes, the current reading, a photo of the transfer and the person responsible for follow-up.
The inspection then finds three related issues: build-up on one pulley face, a return roller beginning to bind and a guide bracket that was moved during a product changeover. Cleaning the pulley, replacing the roller and restoring the guide position solves the condition. The current and tracking are measured again during the same product run to verify the result.
| Why the human detail matters “Noted” is not a closeout. A usable record says what was found, where it was found, what changed, who owns the action, when it is due and how the result will be verified. |
Prioritise defects by consequence, not by how easy they are to fix
| Priority | Example condition | Required response |
| Priority 1 – stop / isolate | Immediate safety risk, failed guard, smoke, severe heat, structural damage or uncontrolled movement. | Use the site emergency and isolation process. |
| Priority 2 – urgent | Near-term failure, product damage or rapidly increasing wear is likely. | Assign owner and earliest controlled repair window. |
| Priority 3 – schedule | Degradation is measurable and stable within the approved operating decision. | Plan parts, labour and verification before the next interval. |
| Priority 4 – monitor | Minor condition needs trend data or engineering review. | Set baseline, review frequency and escalation trigger. |
Maintenance records: make the defect actionable
A spreadsheet, paper card or CMMS can all work if the data is clear. A sophisticated system filled with vague notes is less useful than a simple log with precise locations and closeout discipline.
- Asset ID and exact component or zone number
- Date, shift, operating hours and product or load condition
- Observed condition, measurement, photo or short video reference
- Severity and operating decision
- Assigned owner and due date
- Required parts, tools, access and shutdown window
- Action completed and parts used
- Post-maintenance test result
- Root cause where repeat or significant failure occurred
- Repeat-defect flag so recurring symptoms are not treated as new isolated events
Maintenance KPIs that support better decisions
| KPI | What it tells you | Caution |
| PM completion by due date | Whether planned work is happening when intended. | Do not reward closing tasks without evidence. |
| Defects found before failure | Whether inspections are detecting useful early warnings. | Track severity and corrective action, not only count. |
| Repeat defects | Whether symptoms are being fixed without removing the cause. | Review by component and location. |
| Mean time between failures | Change in operating reliability over time. | Define failure consistently. |
| Mean time to repair | Time from confirmed failure to restored service. | Separate waiting for parts, access and repair time if possible. |
| Downtime by component | Where lost production is actually occurring. | Use categories such as belt, roller, drive, sensor, transfer and external cause. |
| Maintenance cost per operating hour | Cost trend relative to useful production time. | Review with throughput and asset age. |
Critical spare parts: enough to recover, not enough to gather dust
The spare-parts list should reflect failure consequence and lead time. A low-cost sensor that can stop an entire dispatch line may be more critical than a higher-cost part that can be sourced locally within hours.
- Belting, splice materials, modular-belt links or hinge rods matched to the installed specification
- Critical rollers, idlers, bearings, shafts and end caps
- Drive chains, timing belts, sprockets, couplings and keys
- Motor or gearbox strategy: complete spare, repair partner or compatible replacement plan
- Sensors, reflectors, cables, connectors, fuses, relays and safety-device components
- Wear strips, scrapers, guides, stops, fasteners and brackets
- Lubricants and cleaning products clearly labelled for the approved application
Record where each spare is stored, its shelf life or preservation requirement, the machine it fits and the replacement procedure. A spare that cannot be identified at 2 a.m. is not fully available.
Eight steps to build a conveyor maintenance programme people actually use
- Create an asset register. Give every conveyor, zone, drive and critical component a clear ID that can be found on the machine and in the record system.
- Collect the installed manuals and specifications. Confirm belt, chain, lubricant, motor, gearbox, sensor and safety-device details against the actual equipment.
- Rank conveyor criticality. Consider safety, production consequence, product damage, redundancy, part lead time and maintenance access.
- Define tasks and frequencies. Separate running observations, safe stopped checks, measured condition checks and planned shutdown work.
- Write safe job plans. Include isolation, stored-energy control, access, tools, parts, acceptance limits and restart testing.
- Train operators and maintainers together. Operators know how the line behaves; maintainers know how components fail. Both views are needed.
- Create a defect workflow. Every finding needs severity, owner, due date and verification. Do not let the checklist become a parking area for unresolved notes.
- Review after 90 days and after failures. Remove tasks that add no value, strengthen tasks that missed a failure and update intervals using real condition data.
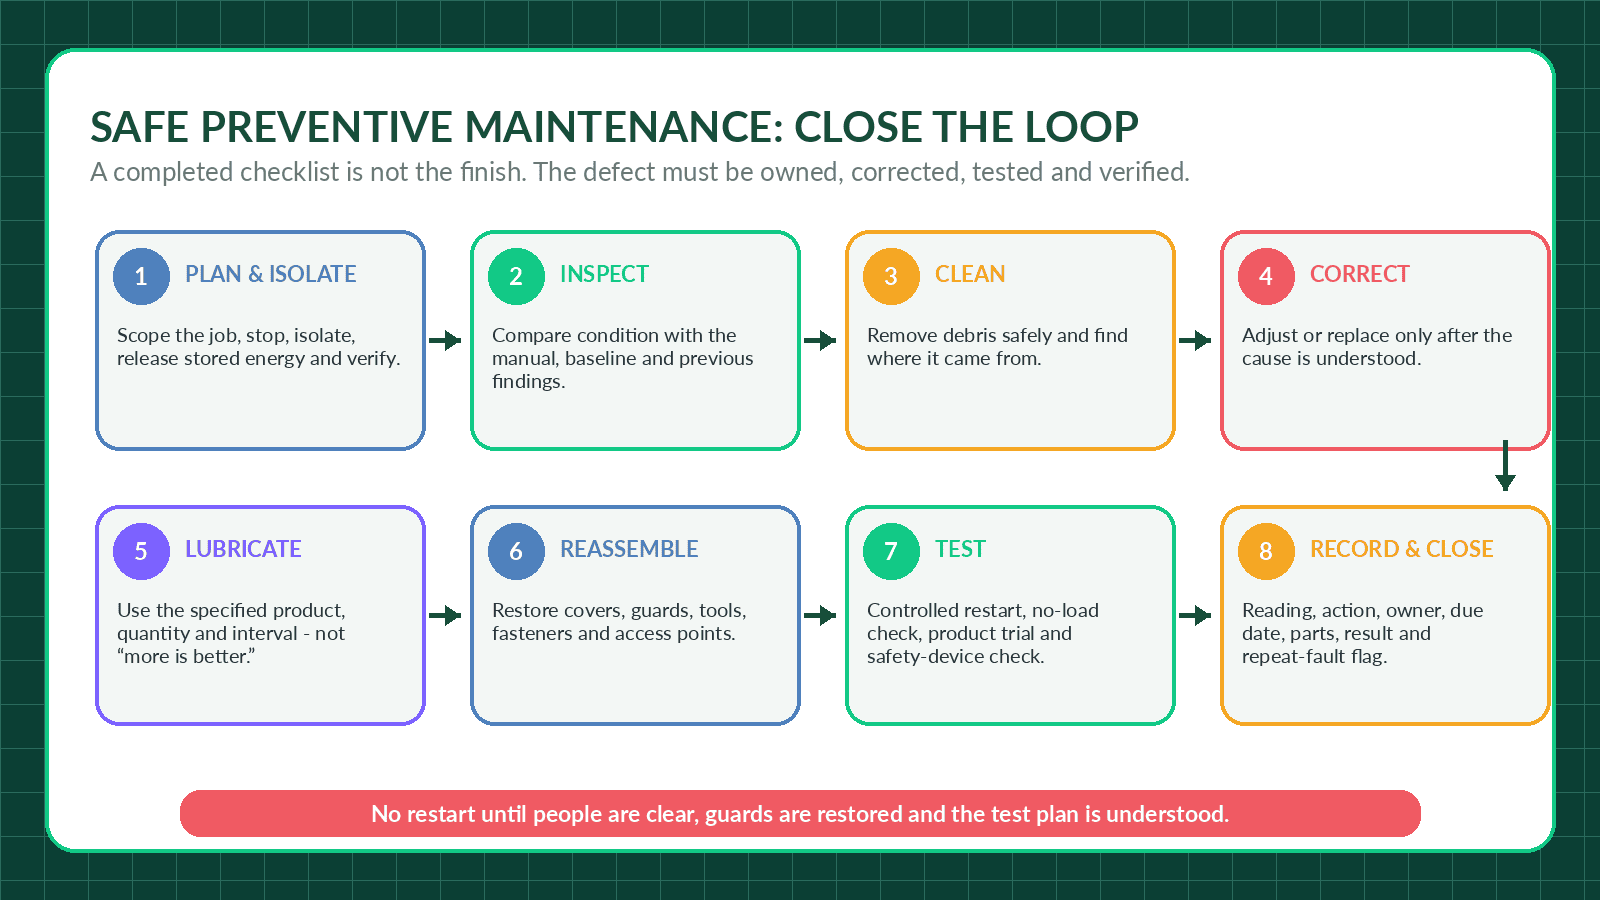
Figure 5. Preventive maintenance closes only after safe reassembly, controlled testing, documentation and verified follow-up.
Common conveyor maintenance mistakes
Using one generic checklist for every conveyor: The common safety and condition questions can be shared, but belt, roller, chain, screw, pallet and telescopic systems need different technical checks.
Lubricating by habit: Wrong lubricant, wrong quantity or unnecessary lubrication can create heat, seal damage or contamination.
Tensioning before finding the cause: Over-tension can hide slip temporarily while increasing bearing, pulley or chain load.
Adjusting tracking around a mechanical defect: A seized roller, dirty pulley, uneven loading or misaligned frame should be corrected before repeated tracking adjustment.
Cleaning without finding the source: Debris returns when a damaged seal, leaking product, poor scraper or transfer problem remains.
Checking only while stopped: Some defects appear only under load, at speed or with a specific product. Observe safely during operation and inspect hands-on only after isolation.
Leaving defects open with no owner: A long defect list does not protect uptime. Ownership and due dates do.
Removing guards for convenience: Maintenance access should be designed, not improvised. Guards must be restored before test and operation.
Testing only with an empty conveyor: Representative product can reveal tracking, transfers, accumulation and sensor problems missed during no-load testing.
Failing to update the plan after a breakdown: Every significant failure is evidence about which task, limit, frequency, spare or design feature needs improvement.
Frequently Asked Questions
1. How often should an industrial conveyor be inspected?
Operators should make brief observations each shift or day, while trained maintenance staff perform scheduled stopped inspections. Weekly, monthly or shutdown frequencies should be adjusted for runtime, environment, criticality, condition trends, manufacturer guidance and failure history.
2. Who should complete a conveyor maintenance checklist?
Operators can record safe running observations and housekeeping issues. Authorised maintenance personnel should complete isolation, hands-on inspection, adjustment, lubrication, electrical work and safety-device testing. Roles should be stated on the checklist.
3. What should be checked daily on a conveyor?
Daily checks usually include sound, product flow, belt or roller movement, transfers, guides, sensor behaviour, leaks, unusual heat or smell, guards, emergency-device accessibility, housekeeping and unresolved defects.
4. What causes a conveyor belt to track to one side?
Possible causes include pulley or idler misalignment, seized rollers, build-up, uneven loading, frame movement, incorrect tension, damaged splice, worn components or a product transfer that pushes the belt. The root cause should be checked before repeated adjustment.
5. Can over-tensioning damage a conveyor?
Yes. Excessive tension can increase load on bearings, shafts, pulleys, chains, splices, belts and the drive. Tension should be set using the design method and approved limit for the installed conveyor.
6. How often should conveyor bearings be lubricated?
There is no universal interval. Some bearings are sealed for life, some require a specified grease and quantity, and some applications use different schedules based on speed, load, temperature, contamination and operating hours. Follow the manufacturer and bearing specification.
7. When should a conveyor roller be replaced?
Replacement may be required when a roller does not rotate freely, is hot or noisy, has a flat spot or shell damage, has loose or failed bearings, marks the product, increases drag or cannot be retained safely. Use equipment-specific criteria.
8. Should emergency stops and pull cords be included in maintenance?
Yes. They should be accessible, undamaged and tested under an approved procedure at a defined frequency. The test should also confirm the expected stop, reset and restart behaviour.
9. Can maintenance checks be performed while the conveyor is running?
Only safe observation tasks should be performed while operating. Hands-on inspection, cleaning near hazards, blockage removal, adjustment or guard removal requires the approved stop and energy-isolation procedure.
10. What information should a conveyor maintenance record contain?
Record the asset and component, time and operating condition, exact defect, measurement or evidence, severity, owner, due date, parts and work completed, post-maintenance test and whether the defect has repeated.
11. What is the difference between preventive and predictive conveyor maintenance?
Preventive maintenance is planned work based on time, cycles, operating hours or risk. Predictive or condition-based maintenance uses trends such as temperature, vibration, current, wear or performance to estimate when intervention is needed. Most plants benefit from a combination.
12. What should be shared with a conveyor manufacturer for maintenance support?
Share the conveyor type and layout, product and load, operating hours, environment, asset and component details, recurring symptoms, photos or video, readings, maintenance history, controls information, required shutdown window and any recent process change.
Conclusion: maintenance works when small warnings have an owner
The best conveyor maintenance programmes are visible on the floor. Operators know what change to report. Technicians can find the right component and limit. Production provides access before a failure forces access. Defects have owners, spares are identifiable and the team verifies the result after the conveyor restarts.
A checklist is useful only when it helps that behaviour happen consistently. Start with the equipment manual and site risk assessment, build a short routine around the actual conveyor, and improve it every time the line teaches you something new.
| Discuss your conveyor requirement with Convello Planning a new conveyor, retrofit or maintenance-ready upgrade? Share the conveyor type, product and load, operating hours, layout, recurring faults, maintenance history, controls and available shutdown window with Convello for an application-specific discussion. |